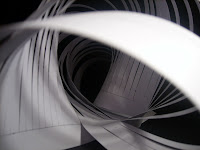
When attending my third and final workshop with Richard Sweeney, i decided to experiment with using grids to create a structure, and then testing different ways to use this concept to create a sculpture.
First attempt:
During my first attempt, i chose to cut alternating slits in the paper with a width of one centimetre. i brought the longest edges together forming a cylinder shape and noticed how the the slim strands of paper rippled due to its weak structure.
Second attempt:
Using the same grid structure as the first attempt, i decided this time to change where i joined the edges. this time i joined them in an irregular fashion which i discovered pushed the paper strands outwards as well as twisting them. although these experiment outcomes, i feel, are not beneficial to my developments referring to pine cones, it was interesting to test out these techniques and see what could be produced.

Third attempt:
This time i chose to make each strand a smaller width of five millimetres, and rather then cutting alternative strands out, i kept all present. i followed the idea of my second attempt and joined the edges together randomly. i loved the outcome and how when photographed i could manipulate the light to highlight the spaces between the paper.

Fourth attempt:
using the same grid structure of my third attempt, i again looked at how where i decided to join the edges created a different shape and effect. i feel this scultpure is not as structured as the last attempt.

Fifth attempt:
 Here i experimented with combing both the first grid structure and the second grid structure, also incorporating layers into the final object. i love how it appears to be intertwined as the smaller strands wrap elegantly around the larger strands. i am fascinated how looking at this piece from different points of perspective can give a different feel to the image. Looking at the piece as a whole, present the feeling of 'coming together', whereas the close up shot illustrates the use of layering.


No comments:
Post a Comment